Assignments February 24-27

27. Text Art – Due Tuesday before class is over

Create a poster using text only, the image should be 8×11 or bigger. Below are two examples. Upload to your blog and title the post “Text Art” and give your piece a title in the caption.


28. Filters Due Thursday before class is over

This link gives you a video on how to use the blend modes. Using the different blend modes in class, create an image. This link gives you a video on how to use the different filters. Using the artistic filters change two of your photos to make them look like you drew them or painted them. Make sure that the images are at least 8×10, save as a JPEG and upload to your blog along with the original images, titled “Filters” and as a gallery 2×3. Title the original as original and title the edited as edited.

Assignments February 17-20

You can use this link to get more information on how to use the text tool.

25. Text – Due Monday before class is over

We will go over how to use the text tool. Here is a video. Then write your full name using the text tool and other add-ins that we learned. Include a background that you create with paintbrushes or an image that would go along with the way that you created your name. When you are finished upload to your blog as “Text,” make sure it is a jpeg and title the image.

26. Text CD – Due Tuesday before class is over

Create a CD cover and back side of the CD cover. This should be 5×10 document. Put a line through the middle. The top half will be the front of the CD cover and the bottom half will be the back side of the CD cover. The front should include a title of the band, the name of the CD, and some kind of graphics that you design. The back side should include ten song names and some kind of graphics that go along with the front. Upload your cd cover to your blog, make sure it is a jpeg. Don’t just use one big picture, make it look good. Title the blog post “CD” and give your CD a title in the caption area.

27. Text Art – Due Thursday before class is over

Create a poster using text only, the image should be 8×11 or bigger. Below are two examples. Upload to your blog and title the post “Text Art” and give your piece a title in the caption.

Assignments February 10-13

This link will show more on how to use the tools below.

21. Dodge, Burn, Sponge Tool – Due Monday before class is over

We will go over how to use the dodge, burn, and sponge tools, along with the red eye fix, and history tool, in class using the images below (download to your computer). Here is a video if you missed class or need help. You will turn in the following to your blog as a gallery: 1. Brighten up the girls teeth, get rid of the shine on her face, and the green in her hair using the dodge, burn, and sponge tools. 2. Get rid of the kids red eyes, using the red eye tool. 3. Using an image of your own, turn it into black and white image and use the history brush to add back some of the color. This post will be titled “Dodge, Burn, Sponge Tool.” 

22. Clone and Heal Tool – Due Tuesday before class is over

We will go over how to use the clone and healing tools. Here is a video. Using the clone and heal tool clean up Bluebeard’s face as much as you can. Upload to your blog as “Clone and Heal Tool.”

Below is the photo to use

ED SIMPSON INTERNATIONAL PEOPLE © 1997 PHOTOSPIN www.photospin.com

23. Blur, Sharpen, Smudge Tool – Due Wednesday before class is over

We will go over how to use the tool. Here is a video. Then you will use three different images, one for each tool. Upload to your blog as “Blur, Sharpen, Smudge.” This will be a gallery with all three images and the original 2×3, title each image the name of the tool used.

24. Put Yourself in History – Due Thursday before class is over

Find a historic photo online and include yourself in the scene. Make sure the image is large enough. Adjust size, color and resolution to match the historic photo to look as realistic as possible. Under your photo write a 2-3 sentence explanation as to why you chose to put yourself in this historic photo. Title your post “History.” Include the original image and title both images, one should be titled original and the other should be titled edited. Sample below:

Assignments February 3-6

This link will give you more information on each tool used this week.

17. Marquee Tool – Due at the end of class Monday

We will go over how to use the marquee tool in class, here is a link for the rectangle tool and here is a link for the elliptical marquee tool. Then you will take three pictures and use the marquee tool to crop out the unwanted background or what you don’t want. Then place them onto one blank page. One picture needs to use feathering, one needs to be rotated and to a color adjustment, and the third photo needs to be an elliptical that is sized and desaturated. Make sure that the picture is saved as a .jpeg before you upload to your blog. All three images will be saved onto one background. Name your blog post “Marquee Tool” and title your image.

18. Quick Selection Tool – Due at the end of class Monday 

Go over how to use the quick selection and magic wand tools, here is a link to help with the quick selection tool and here is a link for the magic wand.. Using the quick selection tool, select an object out of a photo and place it into a new document, size it and rotate it. Then use the quick selection tool on another object and feather it before taking it out and moving it to the new document. You will have two images on one document. Upload to your blog, title the blog post “Quick Selection Tool” and title your image.

19. Lasso Tool – Due at the end of class Tuesday

Go over how to use the lasso and magnetic lasso tools, you can go to this link to see again how to use the tool. This link will show how to use the polygonal lasso tool, and this link will show how to use the magnetic lasso tool. Using the lasso tool, select an object in a photo and move it into a new background, try to make the photo blend in, make sure that you cut the photo out correctly. Upload to your blog, title the blog post “Lasso Tool” and title your image. 

20. Selection Assignment – Due at the end of class Thursday

Now that we have gone over the selection tools you will complete the following assignment: Take a photo of a landscape/background, and add four other photos (animal, person, food, etc) to it. Make sure that the photos that you add to the background make sense and look realistic (like they belong) by changing the color, saturation, vibrance, etc. This needs to be at least an 8.5×11. Make sure to save it as a JPEG before uploading to your blog, put this in a gallery 2×1 with the original background image used and the image with your images added in, title your blog post “Selection Assignment” and title your photo. Below are two student examples.

Assignments January 27-30

15. Paint/Trace Due Wednesday before class is over

We will go over more uses with the layers in class and how to trace, here is a video if you missed the lesson or need help. You will trace and color in a still life or animal photo of your choice. Make sure that the image that you choose is at least a 4×6 in size. After you trace, color in using different colors to shade and color in to look realistic/good, while you are working on the project save as a PSD file, when you are done delete the extra layer and save as a jpeg. Submit to your blog as a gallery 2×1 with the original image, blog post title should be “Paint/Trace” and then title your image and title the original as original. Below is an example.

Digital Art 1 by: Kye

16. Paintings – Due Thursday before class is over

Download different brush stamps from brusheezy.com or psbrushes.net. You will paint two different paintings. The first one will be a background using different paint brushes. It needs to be a 11×8.5. The second painting should be a landscape or a still life using different brushes. This should be painted on your own. This needs to be a 11×8 and fill the page. Save both as a JPEG. Upload to your blog as a gallery 2×1, blog title should be “Paintings” and title each image what you want them to be. Here is a video if you missed class or need help remembering how to use the tools.

Assignments January 20-23

10. What Is Graphic Design – Due Monday before class is over

Watch the following video and then write two paragraphs explaining what graphic design is and where it is found. Explain the importance of graphic design in our world and everyday uses. (If the video doesn’t start at the beginning, please start it over so that you watch the entire video.) Upload to your blog as a blog post, not a Word Document, title the post “What is Graphic Design.”

11. Color Corrections – Due Tuesday before class is over

Go over how color corrections on Photoshop, here is a video and here is another video. When finished with the tutorial you should upload four images to your blog in a gallery. Each photo will use a different color correction adjustment. Include the original and the edited. You will upload the following: desaturated photo, brightness and contrast photo, vibrance, hue and saturation and levels. Your blog post title should be “Color Corrections”. You must title each photo to correspond with the adjustment used in the caption area and the other image should be titled original, and put into a gallery 2×4

12. Color Corrections 2 – Due Wednesday before class is over

Go over more color corrections on Photoshop using the same videos. When finished you should upload two photos in a gallery. One photo will be photo filter and the other will be a layer adjustment. Include the original, title the edited photo to correspond with the adjustment and the other image should be titled original, put into a gallery 2×2. Title the blog post “Color Corrections 2.”

13. Self Portrait – Due Wednesday before class is over

You will take a photo of yourself, you can either take one now on your computer or use one that you already have saved. You will then edit the photo using the color adjustments that we have gone over in class to create a unique portrait of yourself. Upload to your blog, the blog post should be titled “Self Portrait” and title your photo in the caption area and include the original image and title it original. Put this in a gallery 2×1

14. Black and White Painting – Due Thursday before class is over

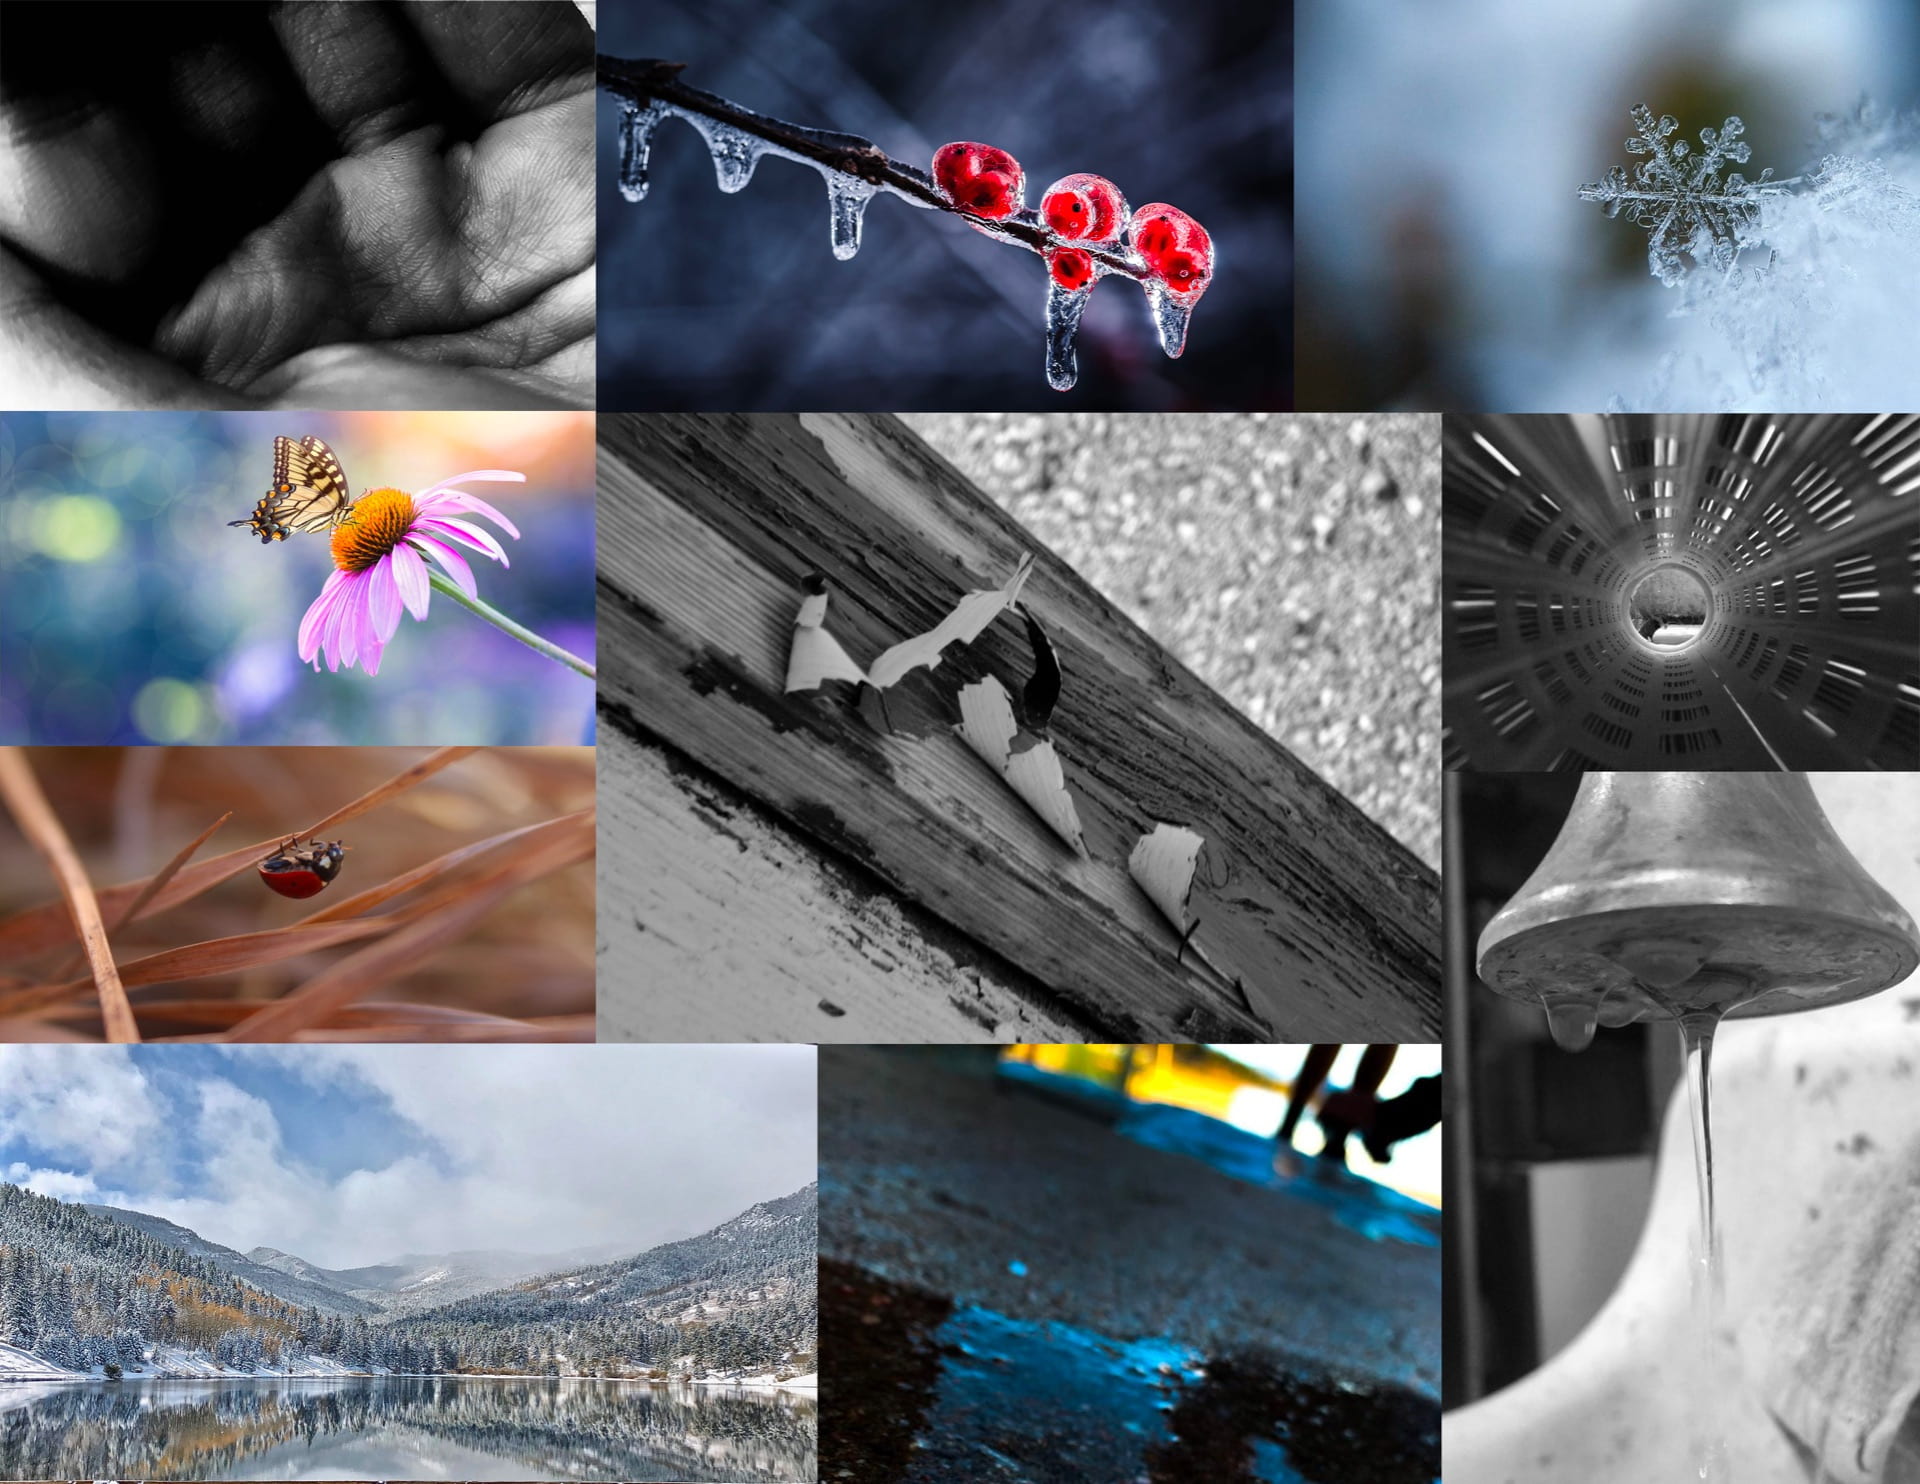
Using three different black and white photos, paint in color, use different techniques, hues, saturation, color, etc. Upload to your blog, this should be in a gallery 3×1 with the three images, each image should be titled what you want them to be and the blog post should be titled “Black and White Painting.” Here is a video if you missed class or need help remembering how to use the tools.


Assignments January 13-16

This link has instructions and videos on how to do 5-8, if you are absent or forget how to use the tool you can always go back and look at the link for help.

5. Image Size – Due Monday before class is over

Go over how to change the image size of an image. Submit on your blog the original image and the edited image as a gallery 2×1. Title the images in the caption box as original and edited. Title the blog post “Image Size.”

6. Resolution – Due Monday before class is over

Go over how to change the image resolution. Submit on your blog the original image and the edited image as a gallery 2×1. Title the images in the caption box as original and edited. Title the blog post “Resolution.”

7. Crop and Straighten – Due Tuesday before class is over

Go over how to crop and straighten images. Submit on your blog the original image and the edited image as a gallery 2×1. Title the images in the caption box as original and edited. Title the blog post “Crop Tool.”

8. Expand Canvas – Due Tuesday before class is over

Go over how to expand the canvas. Submit on your blog the original image and the edited image as a gallery 2×1. Title the images in the caption box as original and edited. Title the blog post “Expand Canvas.”

This link has instructions and videos on how to do 9, if you are absent or forget how to use the tool you can always go back and look at the link for help.

9. Understanding Layers – Due Thursday before class is over

Go over how to use layers. Use this link if you are absent or forget how to do something. Create an image that is 8.5×11 or 11×8.5, find and add at least ten photos that represent you to the new document. Move and size each image to fit. Make sure to save the image as a JPEG when you are done with the project, as you are working you should save as PSD. Title the image. Title the blog post “Layers.” Below is an example. 

My Collage


Assignments January 6-9

1. Make a Blog – Due Tuesday before class is over 

Make a blog for your photo work and critique writing. http://edublogs.org/

You must join the class blog: https://kacieanglin.edublogs.org… FIRST BEFORE YOU PICK A TEMPLATE.

Follow the link for help on adding the class blog http://help.edublogs.org/own-student-blog/ when it asks you to search for the teacher type in kacieanglin.

Include your blog title and your first name on your blog.

2. About me – Due Tuesday before class is over

Write an about me section as a TEXT WIDGET on your blog. Follow the link for help on adding a text widget http://help.edublogs.org/widgets/#Adding_Widgets

3. First Post and Gallery – Due Wednesday before class is over

Make your very first post, find a photo online that is meaningful to you or shows something about you. Include a title for the photo. Then write about the photo and what it means to you, why you chose it, and what you like about it. Title the blog post “First Post”. Then make a gallery post with four photos, 2×2. I will go over how to do each of these in class. Make sure that each photo has a title; this blog post will be titled “Gallery”. 

4. Introduction to Photoshop – Thursday

Introduction to Photoshop, we will go over opening, closing, saving, creating a document, and the workspace. Nothing will be due, you will just follow along. If you forget how to do something or you missed the class, here is a video showing what we went over and this website will help as well.

Assignments 28-29

64. PowerPoint or Spark Presentation 

Create a PowerPoint or Spark presentation with the projects that you have created throughout the semester. You should have a title slide with the title of the project, your name and some kind of drawing that you created. The rest of the presentation will have your favorite 10 projects that you created during the semester. Each slide should include your piece, a title for the piece, and why you liked this project or what you did with the project (Do not say, “this was an easy project,” or “this was fun.” You need to explain in complete sentences what you liked about the project and how you created it). When you are done you need to upload the file to your blog as “PowerPoint or Spark Presentation,” if you can’t get it to upload to your blog email it to me.

You will be graded on:

One title slide with your name, the title, and a drawing that you created

10 of your favorite project or piece created

Each slide has the piece clearly visible, a title, and a reason why you chose this piece to include in the slide show

Creativity of PowerPoint, including color and font scheme

Assignments May 20-23

62. Car Design – Due Tuesday before class is over

Your job is to personalize a picture of a car with your own colors, logos, and background. Your final product must be a well-developed, attractive advertisement complete with the car’s manufacturer logo and unique catchy slogan. Find pictures of the car you want to make your advertisement for and save them. Paint them with any color and design your mind creates, and add logos to the car and/or background to incorporate your personalized style. BE CREATIVE! Take out the white background and place them in a setting of your choosing. Finally, add some text that conveys your unique slogan to finish off your advertisement. Upload to your blog as “Car Design.” Below are examples.

63. Superhero – Due Thursday before class is over

Use a black and white image of a superhero, color it in using Photoshop tools, pay attention to lighting and shading. Then put your superhero into a different background. Include in your post the original image of the superhero, the original image of the background, and your completed piece. Upload to your blog as “Superhero.” Below are examples.